- Like
- SHARE
- Digg
- Del
- Tumblr
- VKontakte
- Flattr
- Buffer
- Love This
- Save
- Odnoklassniki
- Meneame
- Blogger
- Amazon
- Yahoo Mail
- Gmail
- AOL
- Newsvine
- HackerNews
- Evernote
- MySpace
- Mail.ru
- Viadeo
- Line
- Comments
- Yummly
- SMS
- Viber
- Telegram
- JOIN
- Skype
- Facebook Messenger
- Kakao
- LiveJournal
- Yammer
- Edgar
- Fintel
- Mix
- Instapaper
- Copy Link
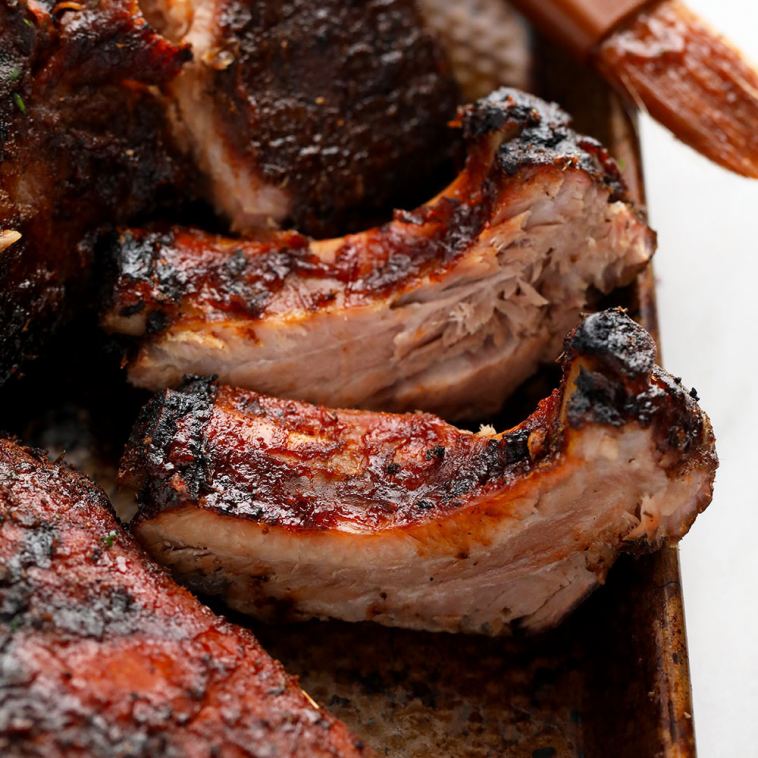
It’s time for you to make our 24-hour, ultra-tender, fall-off-the-bone sous vide ribs!
These bbq ribs are rubbed with a smokey dry rub, cooked in a sous vide bath for 24 hours, slathered with BBQ sauce, and then grilled to perfection.
Let’s Make The Best Ribs!
It is a treat in our house when it’s rib night. It’s an even bigger treat when we get to eat sous vide ribs. Fall off the bone, flavorful, finger-licking-good ribs. I mean the ribs literally fall off the bone when you pick them up!
Now, there is a long debate over the best way to cook ribs. Some people like them smoked, some like them grilled, and some like them baked. We like to eat ribs every way, but the very best way is Sous Vide Ribs…specifically 24-hour sous vide ribs!
We love our sous vide. We break down everything you need to know about sous vide cooking in our Guide to Sous Vide right here, so check out what all of our favorite tips and tricks are there!
24 hours? Really?!
You are reading this correctly. This recipe is going to teach you how to cook your rack of ribs for a full 24 hours. Why 24 hours? Well, cooking your ribs in a perfectly heated water bath for 24 hours is going to ensure a few things:
- Cooked to perfect to medium – no fear, it’s impossible to over or undercook your ribs when you use this method!
- Fall off the bone tenderness – there is nothing worse than a chewy rib and let me tell you, these are so perfect and tender!
For sous vide ribs, it’s all about flavoring the meat, sous vide cook time, and then a final grill or broil to caramelize the bbq sauce. Let’s dig a little deeper!
What kind of ribs do I use for Sous Vide Ribs?
Make sure to purchase a full rack of pork ribs for this sous vide ribs recipe. You can find full racks of ribs in the butcher section of most grocery stores.
How to Make Sous Vide Ribs
Step 1: Remove Membrane + Rub
First things first, it’s time to prep your pork ribs! Take your rack of ribs out of the packaging and place it on a cutting board or baking sheet. Use a knife to remove the white membrane on the backside of the ribs.
Removing the membrane will make it easier to eat in the long run and it should peel up quite nicely once you get a hold of it.
Next, it’s time to make a delicious spice rub. We used our favorite dry rub for pork because it is the perfect balance between savory and sweet, but if you like things even smokier, I suggest adding in some paprika!
Why dry rub your ribs before cooking sous vide?
- Using a spice rub adds so much flavor to your meat.
- The salt and sugar in our dry rub for pork will help to tenderize the meat during the sous vide process.
For this sous vide pork ribs recipe, we added spices before cooking sous vide and then AGAIN right before we grill them, so be sure to save 1/4 cup of your dry rub for the end of the recipe!
Here’s a Tip–> To get the most bang for your buck with this dry rub, be sure to cover the whole rack of ribs (front and back) and massage the dry rub in with your hands!
Step 2: Package and Seal Ribs
After the ribs have been rubbed down with dry rub, it’s time to seal the ribs in an airtight bag before placing them into a water bath for 24-hours.
Because the ribs will be submerged in water, we can’t stress enough how important it is to make sure that nothing can get in or out of the bag you seal the ribs in. We used a Food Saver bag and Food Savor Machine.
If you don’t have a Food Saver, no worries! Ziplocs work just fine. Place the ribs into the bag and remove as much air from the bag as possible and then seal.
A large Stasher bag is also a great option for your sous vide. You make have to cut your rack of ribs into three to make them fit.
Here’s a tip–> Feel free to double bag your ribs if you’re nervous! Better safe than sorry!
Step 3: Water Bath + Cook Time
Now that the ribs are wrapped up nice and tight, it’s time to throw them into the sous vide water bath!
We have found that the perfect temperature for our sous vide ribs is 152ºF. Ribs can be safely eaten once they’ve reached an internal temperature of 145ºF, but we like to increase the temp to break down the meat and to really tenderize it.
All you have to do is submerge the ribs in the water bath and set the timer to 24 hours and let them cook!
A Few Tips
Tin Foil –> Cover your pot with tin foil to prevent the water from evaporating. Trust me, it works!
Check Water –> Check on your ribs ever 6-12 hours to be sure that water hasn’t evaporated. If it has, just pour enough hot water back into the pot to make sure the ribs stay underwater for the whole 24 hours.
Clips –> Bag clips or clothespins make for an amazing tool for helping your bag of meat stay submerged. Clip them right to the side of the pot.
Step 4: Grill + Sauce
You’re nearly done! After 24 hours of sous vide cooking all you have left is crisping up the outside of your delicious ribs.
Preheat your grill to 450ºF. You want it to get super hot so you can get a quick sear on your ribs!
Carefully remove the ribs from the water bath and blot them with a paper towel to remove moisture from the ribs. We do this so that we can really crispy up the outside of the ribs!
From there add the rest of the dry rub to the ribs and paint on your bbq sauce.
Place the ribs on the grill and sear them on each side for about 5 minutes or until they begin to char.
Remember: at this point, you can safely eat your ribs as they’ve been cooked over the USDA approved temperature. This step is really to provide texture and to help caramelize the bbq sauce.
BBQ Sauce Recommendations
- Sweet Baby Rays
- Stubbs
- Wee Willy’s
Answers to your Questions
How long do I have to sous vide ribs? To get tender, juicy ribs, we suggest cooking your ribs in the sous vide for a full 24 hours.
Best temperature for sous vide ribs? The best temperature to sous vide ribs at is 152ºF. According to the USDA, ribs can safely be eaten with an internal temperature of 145ºF.
How to prevent your sous vide water bath from evaporating: The easiest way to prevent your water bath from evaporating is to cover the pot.
We suggest using tin foil because it’s cheap and easy. Don’t have tin foil? Use ping pong balls! This may sound silly, but we’ve done it and it works. Cover the top of the water bath with ping pong balls and the water won’t evaporate as fast.
Sous Vide Recipes
- Mongolian Steak Sous Vide Flank Steak
- Crispy Sous Vide Chicken Thighs
- Sous Vide Salmon
- Sous Vide Chicken Breast
Watch How to Make this Recipe
Recipe
24 Hour Sous Vide Ribs V
These bbq ribs are rubbed with a smokey dry rub, cooked in a sous vide bath for 24 hours, slathered with BBQ sauce, and then grilled to perfection.
- Prep Time: 20 minutes
- Cook Time: 24 hours
- Total Time: 24 hours 20 minutes
Author: Lee Funke
Yield: 4 servings 1x
Category: Dinner
Method: Grilling
Cuisine: American
Ingredients
- 1 rack of ribs
- 1/2 tablespoon olive oil
- 3/4 cup pork dry rub*, divided
- 1/2 cup BBQ sauce (or more, to taste)
Instructions
- First, fill a large pot with water (something large enough to submerge your ribs). Preheat your sous vide water bath to 152ºF by attaching your sous vide to the side of the pot.
- Next, prepare pork dry rub by combining all of the spices together in a medium bowl and set aside.
- Then, remove rack of ribs from the package and place it onto a large baking sheet. Use a sharp knife to cut the rack in half. Then, flip the ribs over and remove the white membrane by peeling it back. Discard membrane.
- Generously season ribs with your dry rub. Use about 1/2 cup of dry rub at this point and save the rest for later. Use your hands to massage the rub into the front and back of the ribs.
- Transfer each half rack of ribs into 2 separate food saver bags and remove as much air as possible and seal. Submerge bags into the sous vide water bath and use 2 clips to attach them to the side of the pot. Cover pot with a piece of tin foil, leaving a hole for the sous vide to stick out. The reason we do this is to prevent evaporation overnight.
- Set timer for 24-hours. Make sure to check water level every so often to make sure that the water does not evaporate. If it does, just add more.
- Once the 24-hours is up, remove bags from water bath and then cut them open with a pair of scissors. Discard the juices and remove the ribs. Place ribs on top of paper towel and use an additional paper towel to blot any moisture out of them.
- Use around 1/4 cup more of dry rub to season the front and back of the ribs. Then, use a brush to apply a layer of your favorite BBQ sauce. You can use as much or as little BBQ sauce as you’d like.
- Preheat grill to 450ºF. Then, rub grill grates with olive oil or spray with nonstick cooking spray. Grill both sides of the ribs for 5-6 minutes or until you get a charred edge.
- Let ribs rest for 5-10 minutes before serving.
Notes
*If your ribs are cool when you start the grilling process, we suggest turning your grill to about 350ºF and heating your rack for 10 mintues before adding the sauce and turning the heat up to 450ºF.
Nutrition
- Serving Size: 1/4
- Calories: 360
- Sugar: 14
- Fat: 17
- Carbohydrates: 31
- Fiber: 2
- Protein: 51