- Like
- SHARE
- Digg
- Del
- Tumblr
- VKontakte
- Flattr
- Buffer
- Love This
- Save
- Odnoklassniki
- Meneame
- Blogger
- Amazon
- Yahoo Mail
- Gmail
- AOL
- Newsvine
- HackerNews
- Evernote
- MySpace
- Mail.ru
- Viadeo
- Line
- Comments
- Yummly
- SMS
- Viber
- Telegram
- JOIN
- Skype
- Facebook Messenger
- Kakao
- LiveJournal
- Yammer
- Edgar
- Fintel
- Mix
- Instapaper
- Copy Link
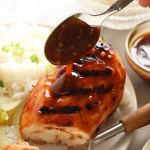
These are the best Crispy Baked Buffalo Wings you’ll ever make – we promise! There’s no need for a deep fryer here thanks to a special ingredient that you already have in your pantry and our fail-proof method. Toss them with your favorite wing sauce or our 5-Ingredient Buffalo Sauce for a show-stopping appetizer that’s great for game day or anytime the urge for chicken wings strikes.
This post was originally published on February 9th, 2017. Updated on February 3rd, 2021.

Where are our Buffalo wing lovers at?
We have yet to meet anyone who doesn’t love Buffalo wings or anything Buffalo-flavored. It’s just such an intoxicating mix of spicy, savory, and buttery with just a hint of vinegar and garlic. And then there’s the creamy dressing for dunking. It’s no wonder that Buffalo wings are one of the most popular foods in America.
While might not all agree on how spicy the sauce should be but we think it’s pretty safe to say that we all love our wings nice and crispy. After all, it’s those little ridges on the crinkly, crispy skin that catch the thick, spicy sauce. Wings that are soft, slimy, or generally floppy are just not acceptable.
The only problem is that to get really crispy skin you have to fry your wings (which if you’re headed to your local wing joint, it isn’t going to be done with the healthiest of oils). Don’t worry, we’re not going to be doing any frying here either because this is all about how to bake crispy chicken wings. The secret to which is…BAKING POWDER.
No kidding. Baking powder. Just like you use in baked goods and you probably already have some in your pantry. So simple!
Why Our Buffalo Wings Are Better For You
You might be wondering why we’d be sharing a recipe for Buffalo chicken wings here since they’re not exactly the first thing that comes to mind when you think of ‘healthy’ eating but that’s EXACTLY why we are sharing them! Our philosophy is that life is too short not to enjoy comfort foods like crispy Buffalo wings and it’s our job to show you how to make the best wings without deep frying.
Our method not only uses a secret ingredient that lets you forgo the frying, but it also uses a trick that keeps the wings up out of their rendered fat which not only results in leaner wings but also gives them that crispy crunch you crave.
How Our Baked Buffalo Wings Can Fit Into Your Diet
We love nothing more than creating healthier versions of the comfort foods you love and doing so in a way that lets everyone enjoy them. With that in mind, we created these crispy baked Buffalo wings with these diets and preferences in mind:
- Gluten-Free: We skipped the batter and breading which makes this baked chicken wing recipe naturally gluten-free
- Dairy-Free: We’ve included a dairy-free option for the Buffalo Sauce so there’s no need to skip the sauce you love if the butter in the sauce doesn’t love you back
- Whole30: Yes, you can enjoy crispy Buffalo chicken wings while eating Whole30. Baking powder is not technically compliant if it contains corn starch so we give you tips for making a simple, Whole30-compatible swap for the baking powder so you get all the crispiness without the cornstarch
- Paleo & Grain-Free: See above, the same thing applies here
- Egg-Free: Again, no breading and no batter so no eggs necessary
Cooking Tips & Substitutions
- To make your baked Buffalo wings Paleo-friendly and Whole30-compatible, substitute 1 teaspoon baking soda + 2 teaspoons cream of tartar for the 1 tablespoon of baking powder in the recipe
- To make the Buffalo sauce dairy-free, replace the butter or ghee with an equal amount of coconut oil
This post may contain affiliate links that won’t change your price but will share some commission.

How to Make the BEST Crispy Baked Buffalo Wings
Start by preheating your oven to 250℉. Line a large rimmed baking sheet with foil for easy clean then place a baking/cooling rack onto the baking sheet.
Next, you want to separate the wings into pieces if your wings are whole. Discard the wing tips or freeze them to use later in your next batch of chicken broth (Click here for our Instant Pot Bone Broth recipe and tutorial). Once you have the wings separated into ‘flats’ (the mid-section of the wing) and ‘drumettes’ (the part that looks like a mini chicken leg), place them in a large bowl.
If the wings were frozen and then thawed, be sure to drain off any excess liquid then pat them dry with paper towels before moving onto the next step.
Now sprinkle the wings with the baking powder (NOT BAKING SODA – those are two entirely different things and using soda will result in highly unpalatable wings) and salt and toss well to coat.
A good rule of thumb here is to use 1 teaspoon of baking powder for every pound of chicken wings, just in case you find yourself with more or less than the 3 pounds called for in this recipe.

Gently mix the baking powder and salt into the wings. You can use a spoon if you like but since you’ll be using your hands in the next step you might as well roll up your sleeves and mix it with your hands. Once your wings are coated with the baking powder and salt, carefully arrange them on a baking/cooling rack set on a large rimmed baking sheet. It’s important to use a rack here (like this one) so the fat can drip down below the chicken leaving the skin extra crispy. If you can, arrange the wing pieces so they’re not touching one another. Depending on the size of your pan and rack and if you’re doubling the recipe, you may need to use two pans.
This Will Help You Make the Best Wings
Now place the baking sheet into a preheated 250℉ oven and bake for 30 minutes. NOTE: After 30 minutes the chicken will NOT be fully cooked – you’re not done yet – the next step is where the magic happens.
For the second part of the bake, you’ll crank the oven up to 425℉ and bake the wings for an additional 40 minutes, rotating the pan halfway through. Your finished wings should have skin that is crispy and lightly browned.

While the chicken is baking, prepare the Buffalo sauce if you’re planning to use our 5-Ingredient Homemade Buffalo Sauce. If you’re not making your own, might we suggest this Primal Kitchen Buffalo Sauce? It’s a gamechanger when it comes to premade sauces. Nice and thick and perfectly spiced.
The moment you’ve been waiting for is almost here. Pull that chicken out of the oven when the timer sounds and admire that crispy, crackly skin all ready to doused with spicy goodness. That unreal crispiness is thanks to the baking powder. Crazy, right?!

Need even more crunch? Try this trick!
This is what we’d consider being the ‘fast track’ to crispy baked Buffalo wings because all you have to do is open the package of wings, separate them, pat them dry, and then toss them with baking powder and salt immediately before baking. If you want ULTRA CRISPY wings and you have the good sense to plan ahead for your wing feast then tossing them in the baking powder and placing them in the fridge for 8-12 hours on the baking sheet with a rack is the way to go. Allowing them to rest uncovered in the fridge helps them dry out a bit so that when they’re baked there’s less moisture released (and hence less steam generated) so you get baked wings with an extra-serious crunch. But honestly, they’re pretty darn amazing even without the wait.
Wings wouldn’t be wings without sauce and something creamy to dip them in so before you dive in make sure you’ve got some of our Homemade Paleo Ranch Dressing on hand. Especially if you like those wings HOT!

Hungry for More? Subscribe to get our newsletter delivered straight to your inbox! And be sure to stay in touch on Facebook, Twitter, Pinterest and Instagram for all of the latest updates.
Let’s Get Cookin’
Crispy Baked Buffalo Wings
One simple ingredient gives these wings the crispy skin you crave without frying. Tossed with a 5-ingredient Buffalo sauce, they’re every bit as good as the real thing – only healthier!
- Author: The Real Food Dietitians
- Prep Time: 10 mins
- Cook Time: 1 hour 10 mins
- Total Time: 1 hour 20 mins
- Yield: 6 (~6 wings per serving) 1x
- Category: Appetizer
- Cuisine: Whole30, Paleo

Ingredients
For the Wings:
- 3 lbs. chicken wings, ‘flats’ and ‘drummies’ (About 36 pieces; thawed if frozen, then drained and patted dry)
- 1 Tbsp. baking powder (NOT BAKING SODA) – **Whole30 substitute: 1 tsp. baking soda + 2 tsp. cream of tartar**
- 1 tsp. salt
For the Sauce:
- ⅓ cup ghee or butter* (use coconut oil for dairy-free)
- ½ cup hot pepper sauce (such as Frank’s Red Hot)
- 1 tablespoon apple cider vinegar
- 1 teaspoon garlic powder
- ½ teaspoon paprika
- ½ teaspoon salt
- Pinch of cayenne pepper (optional; adds more heat)
Instructions
- Preheat the oven to 250℉. Line a large rimmed baking sheet with foil. Place a baking/cooling rack on the baking sheet and set aside.
- Place the chicken wing parts in a large bowl. Sprinkle with baking powder and salt. Toss well to coat.
- Arrange the chicken pieces on the baking/cooking rack in a single layer so that pieces are not touching one another (use a second pan with a rack, if needed).
- Place the pan in the oven and cook for 30 minutes at 250℉.
- After 30 minutes, increase the oven temperature to 425℉ and continue cooking for another 20 minutes.
- After 20 minutes, rotate the pan and cook an additional 20 minutes or until the chicken is crispy and lightly browned.
- While the chicken is baking, prepare the sauce by combining the ghee, hot pepper sauce, vinegar, garlic powder, paprika, salt, and cayenne (if using) in a small saucepan over medium heat. Once the ghee or butter is melted, whisk to combine and remove from heat.
- Transfer cooked chicken pieces to a shallow container (such as a 9×13-inch pan) and drizzle with ½ of Buffalo sauce. Toss to coat.
- Serve remaining sauce with wings or save for another use. May also serve with Homemade Paleo Ranch Dressing for extra dipping pleasure.
Notes
* Use ghee or coconut oil for Whole30
Nutrition
- Serving Size: About 6 wings
- Calories: 500
- Sugar: 0g
- Sodium: 955mg
- Fat: 37g
- Carbohydrates: 1g
- Fiber: 1g
- Protein: 34g
Pin in now, Make it later!

All photos and content are copyright protected. Please do not use our photos without prior written permission. If you wish to republish this recipe, please rewrite the recipe in your own unique words and link back to the source recipe here on The Real Food Dietitians. Thank you!
Photo Credit: The photos in this blog post were taken by Jess of Plays Well with Butter
About Jessica Beacom
Jessica is a Registered Dietitian Nutritionist living in Boulder, CO with her hubby and two daughters. She’s been described as a ‘real food evangelist’ and loves sharing her knowledge with others to help them break free of the diet mentality and find their own food freedom. In her spare time she enjoys CrossFit, telemark skiing, mountain biking, teaching herself how to play the banjo and camping out under the stars.