- Like
- SHARE
- Digg
- Del
- Tumblr
- VKontakte
- Flattr
- Buffer
- Love This
- Save
- Odnoklassniki
- Meneame
- Blogger
- Amazon
- Yahoo Mail
- Gmail
- AOL
- Newsvine
- HackerNews
- Evernote
- MySpace
- Mail.ru
- Viadeo
- Line
- Comments
- Yummly
- SMS
- Viber
- Telegram
- JOIN
- Skype
- Facebook Messenger
- Kakao
- LiveJournal
- Yammer
- Edgar
- Fintel
- Mix
- Instapaper
- Copy Link
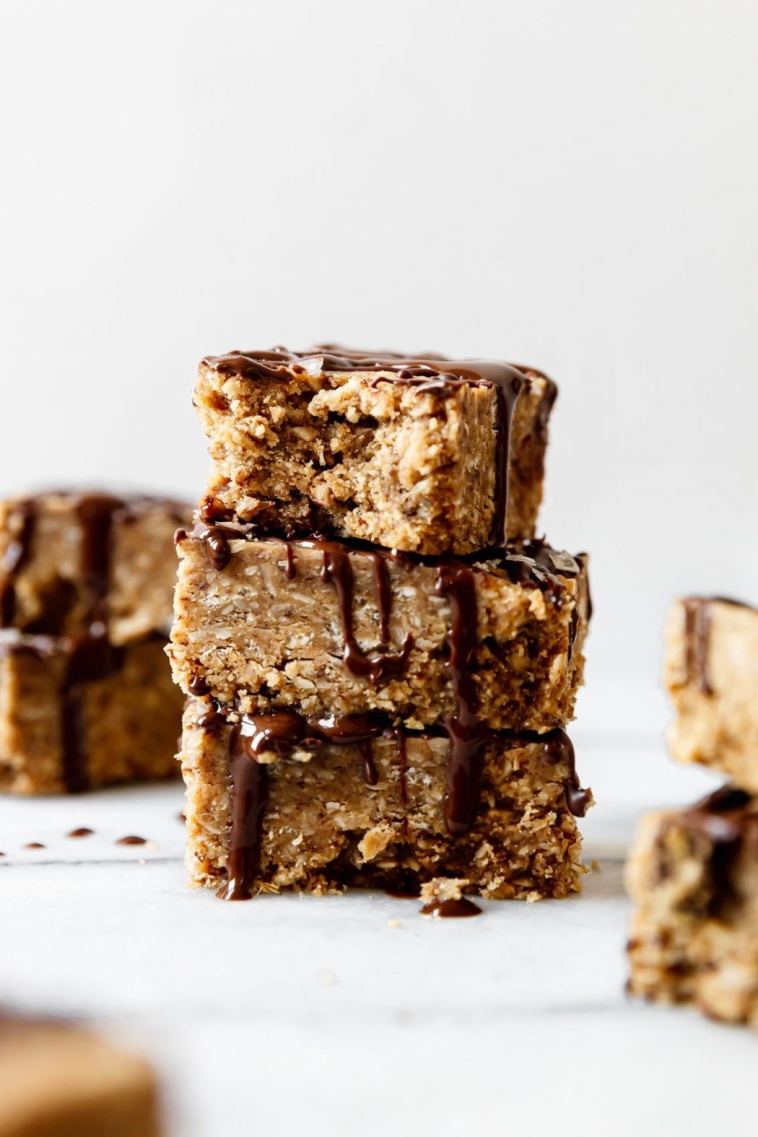
These Peanut Butter Protein Bars come with a nice crunch, thanks to the crisp rice cereal, and are drizzled with just enough melted dark chocolate to create that sweet and salty combination so many people love: chocolate and peanut butter. We can’t wait for you to try these no-bake, easy-to-make homemade protein bars that have the perfect combo of crunch, peanut butter, and chocolate in every chewy, delicious bite. Best of all this protein bar recipe is made with real food ingredients, no artificial sweeteners, and is gluten-free with a vegan option, too.

Homemade Protein Bars – Sensible, Satisfying, and Delicious
Mini Peanut Butter Protein Bars are great for lunch packing, afternoon snacking, serving as a tasty treat, or really any occasion. We like to keep a stash of them in our freezers for when we’re in a bind and need something fast and easy. They’re even great for packaging as a food gift for a friend (perfect for new moms) or just a nice treat to have on hand when that afternoon craving for something a little sweet hits.
These mini energy bars are healthfully balanced, with a nice boost of protein paired with healthy fats, whole grains, and fiber. Each little bar contains 7 grams of protein and only 5 grams of sugar – you won’t find a protein bar like that on store shelves!

This post contains affiliate links that will not change your price but will share some commission.
Ingredient for the Mini Peanut Butter Protein Bars recipe
- Old-fashioned rolled oats – certified gluten-free if needed
- Crisp rice cereal – if you need these protein bars to be gluten-free, you’ll want to be sure you choose a crisp rice cereal that is gluten-free. One Degree Organic Sprout Brown Rice Crisps Cereal is a great gluten-free option.
- Vanilla protein powder – plant-based or whey-based protein will work – when creating this recipe we used Sun Warrior Vegan Vanilla
- Flax meal
- Salt
- Natural peanut butter – room temperature with a drizzly/runny consistency works best. If your nut butter is a more solid consistency at room temperature, simply heat it slightly to achieve desired consistency.
- Honey – for Vegan Protein Bars, substitute agave nectar for the honey.
- Virgin coconut oil
- Pure vanilla extract
- Dark chocolate chips – we like Enjoy Life Dark Chocolate Morsels.
Shop Thrive Market to get the best prices on natural, organic, and specialty foods. PLUS get a free gift valued at $24 when you sign-up! Shop Thrive Market for all of your baking essentials!

How to make Peanut Butter Protein Bars
- Place the oats in a food processor or blender and pulse 10-15 times or until oats are broken down a little. Some of the oats may remain partially whole.
- In a medium bowl combine the oats, cereal, protein powder, flax, salt, peanut butter, honey, coconut oil, and vanilla. Stir to combine well or mix with hands. The dough should stick together easily. If not, add 1-2 teaspoons of water at a time until dough sticks together.
- Line an 8×8-inch pan with parchment paper so that paper overlaps edges. Transfer the dough to the pan. Spread the dough out evenly and with your hands press dough very firmly into the pan.
- Place the pan in the freezer for at least 30 minutes (this can be done the day before or even a few days before).
- For the chocolate drizzle: combine the chocolate chips and coconut oil in a small saucepan over low heat. Stir continuously until smooth and drizzly. You may also use a microwave at 50% power for 30-second increments stirring between each increment until smooth and drizzly.
- After bars have been in the freezer, remove the bars from the pan by grabbing onto the parchment paper flaps, lift them out, and place on a cutting board.
- Drizzle the melted chocolate evenly over the bars. The chocolate should harden quickly since the bars are cold.
- With a sharp knife, cut the bars into 24 small bars (6 rows x 4 rows). Serve and enjoy!
- Store in the fridge in an airtight container for up to 2 weeks or in the freezer for up to 3 months.

How to Store Homemade Protein Bars
Because this protein bar recipe is no-bake and made with only real-food ingredients, they hold together best when stored in the fridge in an airtight container (separate layers with parchment paper) for up to 2 weeks, or in the freezer for up to 3 months. Side note: we like to enjoy them straight out of the freezer, cold and chewy, so we prefer to store them in the freezer!
With that said, if you pack them as a fun, on-the-go healthy snack and you don’t have a cooler with you, they will be just fine for 8 to 10 hours without refrigeration. If that’s the case, they will be a bit on the soft side, so you’ll want to handle them carefully.
Substitution recommendation to make them Vegan Protein Bars
To make these Peanut Butter Protein Bars into Vegan Protein Bars simply make the following substitutions:
- Substitute honey for agave. You could also use maple syrup however we find that agave tends to be a better substitution for honey in this recipe as it also plays a role in the bars sticking together nicely.
- Use your favorite plant-based vanilla protein powder. See our favorites below.

Are protein bars healthy?
This is a great question! The answer is: it depends.
The number of protein bars on the market can be so overwhelming and even as dietitians, we get confused going down the protein bar aisle. Protein bars are not all created equal. Some are great, made with wholesome ingredients but then there are some that may even work against your health and wellness goals instead of for them. They can also come with a hefty price tag.
This is exactly why we set out on a mission to create our own homemade protein bar recipe. A recipe that is not only incredibly delicious and easy to make, but one that is also made with real food ingredients, not a lot of added sweetener, no artificial sweeteners or flavors and is budget-friendly, too!
What is the best protein powder for this homemade protein bar recipe?
Like protein bars, there’s an overwhelming amount of protein powders on the market. Some come with a solid and wholesome ingredient list, and some – not so much. For this recipe, here are the protein powders we recommend and approve of:
- Sun Warrior Vegan Vanilla
- Garden of Life Plant Based Vanilla Protein Powder
- Puori Bourbon Vanilla Whey Protein Powder
- BioChem Vanilla Whey Protein Powder
Other no-bake snack recipes you’ll love:
Peanut Butter Oatmeal Balls with Chocolate Chips
Paleo Almond Joy Protein Bites
No-Bake Peanut Butter Crunch Bars
Hungry for More? Subscribe to get our newsletter delivered straight to your inbox! And be sure to stay in touch on Facebook, Twitter, Pinterest and Instagram for all of the latest updates.
Let’s Get Cookin’
Mini Peanut Butter Protein Bars
These Peanut Butter Protein Bars come with a nice crunch thanks to the crisp rice cereal and are drizzled with just enough melted dark chocolate to create the sweet and salt combination we love – chocolate and peanut butter.
- Author: Stacie Hassing
- Prep Time: 30 min
- Total Time: 30 minutes
- Yield: 24 mini protein bars 1x
- Category: Snack

Instructions
- Place the oats in a food processor or blender and pulse 10-15 times or until oats are broken down a little. Some of the oats may remain partially whole.
- In a medium bowl combine the oats, cereal, protein powder, flax, salt, peanut butter, honey, coconut oil, and vanilla. Stir to combine well or mix with hands. The dough should stick together easily. If not, add 1-2 teaspoons of water at a time until dough sticks together.
- Line an 8×8-inch pan with parchment paper so that paper overlaps edges. Transfer the dough to the pan. Spread the dough out evenly and with your hands press dough very firmly into the pan.
- Place the pan in the freezer for at least 30 minutes (this can be done the day before or even a few days before).
- For the chocolate drizzle: combine the chocolate chips and coconut oil in a small saucepan over low heat. Stir continuously until smooth and drizzly. You may also use a microwave at 50% power for 30-second increments stirring between each increment until smooth and drizzly.
- After bars have been in the freezer, remove the bars from the pan by grabbing onto the parchment paper flaps, lift out, and place on a cutting board.
- Drizzle the chocolate evenly over the bars. The chocolate should harden quickly since the bars are cold.
- With a sharp knife, cut the bars into 24 small bars (6 rows x 4 rows). Serve and enjoy!
- Store in the fridge in an airtight container for up to 2 weeks or in the freezer for up to 3 months.
Notes
* Not all crisp rice cereals are gluten-free so if you are gluten-sensitive or have an allergy to gluten you’ll want to be sure you choose a crisp rice cereal that is gluten-free – like this one.
Nutrition
- Serving Size: 1 bar
- Calories: 140
- Sugar: 5 g
- Sodium: 40 mg
- Fat: 9 g
- Saturated Fat: 2 g
- Carbohydrates: 17 g
- Fiber: 2 g
- Protein: 7 g
Pin it now, Make it Later!

All photos and content are copyright protected. Please do not use our photos without prior written permission. If you wish to republish this recipe, please rewrite the recipe in your own unique words and link back to the source recipe here on The Real Food Dietitians. Thank you!
Photo Credit: The photos in this blog post were taken by Jess of Plays Well with Butter.
About Stacie Hassing
Stacie is a Licensed and Registered Dietitian from rural southern Minnesota where she, her husband and daughter reside with their two pups. She’s a co-founder of The Real Food RDs and content creator of simple and wholesome recipes. She loves all kinds of fitness and has a passion to inspire as many as she can live a healthier and happier life both in and out of the kitchen – the driving force behind the co-development of the The Real Food RDs brand.