- Like
- SHARE
- Digg
- Del
- Tumblr
- VKontakte
- Flattr
- Buffer
- Love This
- Save
- Odnoklassniki
- Meneame
- Blogger
- Amazon
- Yahoo Mail
- Gmail
- AOL
- Newsvine
- HackerNews
- Evernote
- MySpace
- Mail.ru
- Viadeo
- Line
- Comments
- Yummly
- SMS
- Viber
- Telegram
- JOIN
- Skype
- Facebook Messenger
- Kakao
- LiveJournal
- Yammer
- Edgar
- Fintel
- Mix
- Instapaper
- Copy Link
Introduction
By Meg Thompson
Having just polished off the last of this cake (with a little help) this afternoon, I can confirm that it is not only delicious, but nutritious – awesome! It contains a whole world of goodness, is simple to put together, and you don’t even need to bake it! Too good.
It makes the perfect little snack with a cup of tea as it combines some lovely protein from the walnuts and almonds, some high quality fat from the nuts again as well as the coconut, some fabulous vitamin A, C and fibre with the carrot, and is naturally sweetened with dates, which are also high in fibre and potassium. So let’s jump right in.
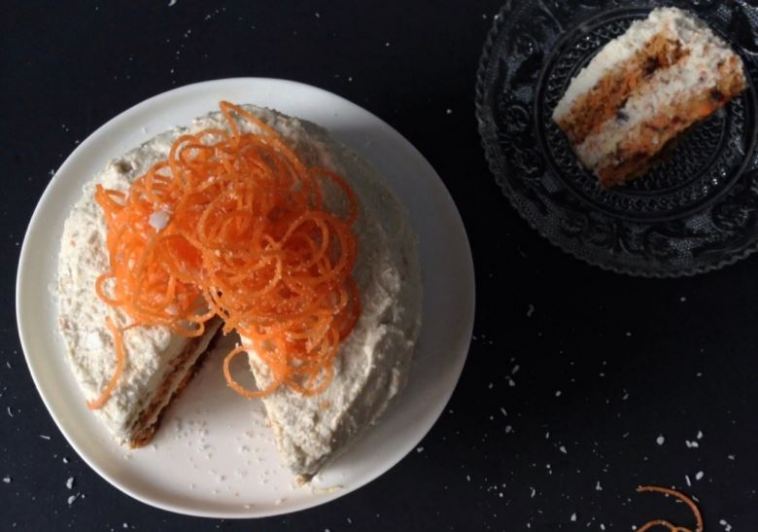
I have presented it as a layer cake, but you could just as easily set it in any dish you like, and have more of a slice style cake. Alternatively, this mix would also make great bliss balls for something different, just shape into balls and roll in desiccated coconut.
No Bake Spiced Carrot Cake with Whipped Coconut Icing
Gluten Free, Dairy Free, Vegan, Grain Free // Makes one small 15cm layer cake, or a larger single layer cake
1/2 cup walnuts
1/4 cup desiccated coconut
1/2 cup almond meal
1 generous cup of grated carrot (about one large carrot)
1/2 cup (about 5) medjool dates, pitted
1/4 tsp ground nutmeg
1/4 tsp ground ginger
1/2 tsp ground cinnamon
For the Icing:
1 400g tin coconut cream (unsweetened, no added emulsifiers)
The zest of 1 orange
1/2 tsp vanilla extract
Place the walnuts, coconut and almond meal into food processor and process until they form a small crumb.
Add all other ingredients and process until dates are well incorporated.
Press into a tin or dish of your choice lined with baking paper.
To make the icing, place the tin of coconut milk in the fridge for at least 4 hours, or overnight (I don’t even need to do this as it’s cold in my kitchen – ha, I knew I’d find a silver lining!). The cold temperature will cause the coconut and the water to separate, and when you open the tin, you will find a thick coconut layer on the top, and the water underneath. If you use a brand with emulsifiers and additives, this separation will not occur, and you won’t be able to achieve the right constancy with the icing.
Carefully scoop out the coconut and place into a bowl – you can use the left-over water for smoothies, soups or curries. Add the orange zest and vanilla, and whisk with a small whisk – you could also use a fork if you don’t have one, or alternatively electric hand held beaters. This will seem difficult at first, but once you get a few stirs in, it will become very easy. Whisk the coconut mix until it is smooth and creamy. I like the icing as is, particularly when paired with this slightly sweeter cake, but if you feel it is not sweet enough for you, feel free to add a tsp or so of maple syrup. Cover the bowl and pop into the fridge until you’re ready to ice the cake.
To assemble, if you are making a layer cake, press half of the mixture into the tin, and pop into the fridge to set for as long as your patience allows – an hour is good. Add a layer of the coconut icing, and then carefully press the remaining cake mix over the top and return to the fridge for 1-2 hours. Remove from the tin and then using a blunt knife, cover the rest of the cake with the remaining icing, and top with a garnish as desired. I have used my spiraliser to make pretty carrot ribbons, but other great toppings would be crushed walnuts, pepitas, desiccated coconut, cacao nibs, shaved chocolate, or sunflower seeds.
Notes: I did not wait the required time for the cake to set before assembling the layers, and it was okay, but would be much better if you have the patience to wait.